|
|
|
|
| ||||||||||||||||||||||||
|
Become a Patron! |
Art tips and techniques, reviews and interviews from my studio. Archived here and at World Famous Comics. Comics 101 for 12/19/2002 Star Wars Gamer #7 - The Anx Week Three: Digital Painting over Pencils - Rendering With Watercolors in Painter Part Two Another key to working in Painter is using a Stylus and a Wacom pad. With only a mouse you will not have the ability of controlling your strokes with as much or as little opacity in your paint as you can as as fluidly or efficiently with a Stylus. The tips of the Stylus are pressure sensitive allowing you to be as opaque or as transparent you want your colors to be with the stroke of you wrist or depending on how much pressure you apply with the Stylus on the pad. The backs of the Stylus, which is essentially an electronic pen or pencil, works like an eraser if you flip it over. This allows you to quickly interchange between whatever current brush tool you have selected and your Eraser brush without having to spend time searching for both back and forth in your Brushes palette. And as artists we're all trained first with a pencil so it's a million times more natural to illustrate with a Stylus than a mouse. Sure it might feel a little wierd the first few times and will take a little patience getting used to but trust me. If you're going to paint digitally and if you're gonna work in Painter, invest in these tools. In the next example, you can see more of my layering process of using the watercolors on the Anx characters. I'm working back and forth between warm and cool tones in the foreground Anx on the right. I'm balancing some of the warm, yellow natural lighting from their planet's sun on the skin of the alien (nothing too chromatic or opaque) along with some subtle blue-ish green washes for the shadow areas on the character's face. I'm also allowing for some of the yellow of the middleground Anx to carry through the face of the green, foreground Anx so the yellow color isn't isolated in one area or character of the artwork. I'm also pushing more yellow, natural lighting from the white-ish sun through the clouds in the background to give them a warm glow. Even in the reddish-brown Anx in the background that I'm starting to render, I'm allowing for some of my yellow wash tones to blend through his highlighted areas as well. 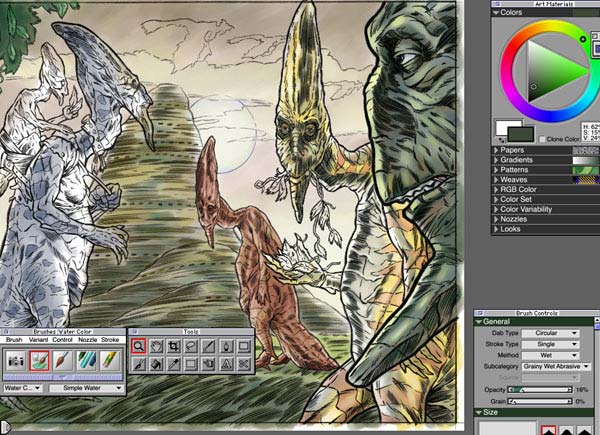
Along with blocking these characters in and rendering them more fully, I'm also 'digitally inking' them by emphasizing and cleaning up the line work on �their forms. I use a darker, more opaque, almost black color with my Watercolor brush with a variety of smaller tips. This gives me more control and sensitivty in inking in the lines that I want to read more clearly. Mostly their outlines and some interior facial details. In the next example, now that the majority of the foreground characters and line work are rendered, I continue working back and forth between layering the foreground and background values and tones. You can see the birds are now being blocked in with more opaque blue, purple and orange tones. I'm also working on the left side of the canvas with more layering of green values and tones for the trees. The same rendering techniques I used on the green foreground Anx I'm beginning to apply to the yellow-brown Anx in the left foreground. With the two foreground Anx almost fully rendered I only have left to add some highlights to complete them. 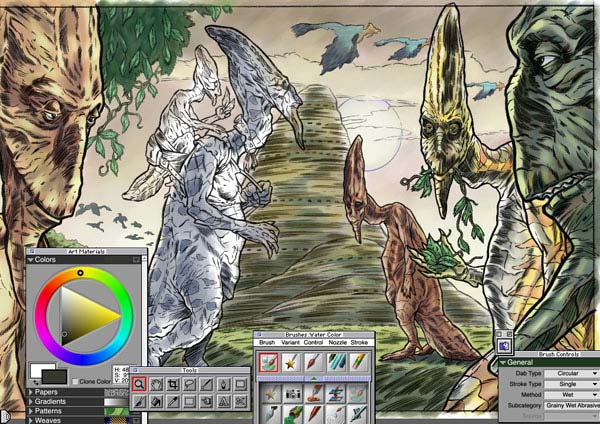
Next week, we'll wrap up and view the last few steps I took to complete this artwork and end up with the final illustration. See ya next time, Joe Recent Columns:
© 2024 - , 153 Sheffield Way, Sandusky, OH 44870 All other ® & © belong to their respective owners. | ||||||||||||||||||||||||